I tend to backup my Outlook PST files in the past, back when free email service providers tend to limit the storage space for each user. I recalled Hotmail only provided each user 2MB of storage while Yahoo! gave 4MB.
It was in the early 2000s when digital cameras were becoming more mainstream, however, photo sharing services was relatively non existent. Unlike these days where we can use Facebook to share photos, back then, the more common method was email. And those photos, though low in resolution and in file size, can quickly fill up the 4MB mailbox.
I recalled having to delete emails, or sometimes, just the attachments to make space for more emails. Another way was to download the emails through a client such as Outlook, and then export the mailbox to PST.
Overtime, I find myself having many PSTs, and while I can open them again, having multiple PSTs opened in Outlook and all them named "Personal Folder" makes it difficult to search for anything. When I right click on the Personal Folder, there isn't a rename option. Clicking on "Data File Properties" will open the PST properties dialog, and under the "General" tab, I find the name of the PST "Personal Folder" greyed out.
If you want to rename it, you need to click through one more step, and that is, under "Advanced...". The "Outlook Data File" dialog will open, and now under the "General" tab, the Name: field is ungreyed and you can rename your PST into something more useful.
Hope this helps.
Tuesday, August 7, 2018


Adding Yahoo! Mail to Outlook Desktop
If you're old school like me and still use Yahoo! for your email, you'll find sometimes using a desktop app such as Outlook is useful to have a single view of all your emails. These days, is common to have more than one email, and they may be from different providers, such as Hotmail (Microsoft), GMail, or Yahoo!.
In the past, the IMAP option for Yahoo! Mail was only extended to Premium users. However, these days, all users can have access to it. Here are the steps to add Yahoo! Mail to your Outlook:
Outlook
1. Launch your Outlook
2. Click on File on the top left corner
3. Under the Info tab, click on "Account Settings"
4. On the Account Settings dialog, under the "Email" tab, click on "New.."
5. Enter your Yahoo! email address and click connect
Web Browser
6. Now, open up web browser login to your Yahoo! email
7. When the mail app is loaded, look for your name on top right of the site
8. Click on your name, and then "Account Info"
9. In the new window, look for "Account Security"
10. Click on "Manage app passwords"
11. Click on the "Select your app" and select "Outlook Desktop"
12. It will then generate a 16 alpha character password
13. Copy that password
Outlook
14. Paste the newly generated password into the password field
15. The emails from Yahoo! should now start syncing
For reference, I'm using Outlook Version 1803 (Build 9126.2259 Click-to-Run) with an Office 365 Subscription.
In the past, the IMAP option for Yahoo! Mail was only extended to Premium users. However, these days, all users can have access to it. Here are the steps to add Yahoo! Mail to your Outlook:
Outlook
1. Launch your Outlook
2. Click on File on the top left corner
3. Under the Info tab, click on "Account Settings"
4. On the Account Settings dialog, under the "Email" tab, click on "New.."
5. Enter your Yahoo! email address and click connect
Web Browser
6. Now, open up web browser login to your Yahoo! email
7. When the mail app is loaded, look for your name on top right of the site
8. Click on your name, and then "Account Info"
9. In the new window, look for "Account Security"
10. Click on "Manage app passwords"
11. Click on the "Select your app" and select "Outlook Desktop"
12. It will then generate a 16 alpha character password
13. Copy that password
Outlook
14. Paste the newly generated password into the password field
15. The emails from Yahoo! should now start syncing
For reference, I'm using Outlook Version 1803 (Build 9126.2259 Click-to-Run) with an Office 365 Subscription.
Tuesday, July 31, 2018
Apple Watch unlocking Mac not working?
If you're an Apple Watch owner and a Mac user, there's a nifty feature that allows your Apple Watch to unlock your Mac automatically. This makes it convenient especially if you're in an office setting and you're constantly in and out of your desk.
To enable this feature, just go to "System Preferences" and then "Security & Privacy". There, you should be able to see under the General tab the option "Allow Your Apple Watch to unlock your Mac". Check it, and you should be done.
To lock your machine when you're leaving your desk, just press and hold down "control" + "shift" and the "power" button. When you're back, make sure you're wearing your watch and it's unlocked, just tap on the mouse pad or any key on the keyboard and your Mac should automatically unlock.
If you're using a company issued Mac, they may put in place security policies that requires you to change your password every so often. Note that once the Mac password is changed, it will mess up this Apple Watch unlock feature causing the Auto Unlock with Apple Watch to stop working. To fix this, you need to head over to "Keychain Access" (Just hit command + space bar to bring up Spotlight and type in "Keychain Access"). Then follow these steps:
Every so often, you may encounter that the Change Password for Keychain "login" greyed out. If this happens, you may have to manually fix this using Terminal. To access terminal, use Spotlight Search (command + space bar) and type "terminal". Terminal.app will appear. Select that.
Then in the terminal prompt and type in "security set-keychain-password" (Without the ""). It will then prompt for Old Password and then the New Password twice. Key those in accordingly. Then head back to System Preferences > Security & Privacy, and enable the Apple Watch unlock option again.
Hope this helps.
To enable this feature, just go to "System Preferences" and then "Security & Privacy". There, you should be able to see under the General tab the option "Allow Your Apple Watch to unlock your Mac". Check it, and you should be done.
To lock your machine when you're leaving your desk, just press and hold down "control" + "shift" and the "power" button. When you're back, make sure you're wearing your watch and it's unlocked, just tap on the mouse pad or any key on the keyboard and your Mac should automatically unlock.
If you're using a company issued Mac, they may put in place security policies that requires you to change your password every so often. Note that once the Mac password is changed, it will mess up this Apple Watch unlock feature causing the Auto Unlock with Apple Watch to stop working. To fix this, you need to head over to "Keychain Access" (Just hit command + space bar to bring up Spotlight and type in "Keychain Access"). Then follow these steps:
- Click “login in” the Keychains list.
- Choose Edit > Change Password for Keychain “login.”
- If the keychain is locked, enter the previous user password for the computer, then click OK.
If you entered the correct password, a new window appears. - Enter the previous user password again in the Current Password field.
- Enter your new user password in the New Password field.
- Reenter the new user password in the Verify field, then click OK.
Every so often, you may encounter that the Change Password for Keychain "login" greyed out. If this happens, you may have to manually fix this using Terminal. To access terminal, use Spotlight Search (command + space bar) and type "terminal". Terminal.app will appear. Select that.
Then in the terminal prompt and type in "security set-keychain-password" (Without the ""). It will then prompt for Old Password and then the New Password twice. Key those in accordingly. Then head back to System Preferences > Security & Privacy, and enable the Apple Watch unlock option again.
Hope this helps.
Thursday, July 26, 2018
Hard disk recovery solutions (Windows)
I've been having some issues with my NTFS drive, in particular a 3.5" Western Digital 2TB which I used as a boot disk with Windows 10. The hard drive failed for no reason one day, and this I found out after Windows refused to boot. Since then, I took it out to try to recover whatever data I can. Windows can't detect the NTFS partition and instead label it as RAW. I've tried using CHKDSK but it will stop after scanning the drive for a while.
Here are some of the tools which I used. As far as success rates go, I have yet to have any positive outcomes with these tools. I'm listing these here for anyone who is willing to try them out. You can let me know in your comments which of these worked better for you.
1. Wondershare RecoverIT (7.1.3)
Their free version allows you to recover up to 100MB, useful if you just need to retrieve a few important documents. Beyond that, you'll have to pay for the full version. This software managed to list down the files and folder in the TreeView, however for some reason, after leaving it to scan after a long while (few hours), the Tree View disappears and I'm just left with raw files without their names. I could not proceed with the recovery because I did not what these files are.
 2. EaseUS Data Recovery Wizard Free 12.0
According to their website, they said you can recover up to 2GB for free. I installed it, and scanned it. It listed a few files. When I tried to recover it, it said I needed to purchase the full version. Obviously I did not proceed with the purchase as it had trouble scanning and listing the files as well for me.
3. MiniTool® Power Data Recovery V8
The free version allows you to recover up to 1GB. Again with all the other solutions, the software froze before the scanning could complete.
4. TestDisk
This requires the user to know how to use the command prompt as there isn't a GUI version. It seemed promising at first but after leaving it to scan for a few hours, I encountered an error and didn't bother to proceed. The good thing about this solution is that is freeware, although you can still donate if you find it useful.
At this juncture, I'm pretty much giving up on recovering my hard disk. This article serves more of a bookmark for me should I encounter another problem hard disk, and hopefully will have better luck with any of the solutions above.
Here are some of the tools which I used. As far as success rates go, I have yet to have any positive outcomes with these tools. I'm listing these here for anyone who is willing to try them out. You can let me know in your comments which of these worked better for you.
1. Wondershare RecoverIT (7.1.3)
Their free version allows you to recover up to 100MB, useful if you just need to retrieve a few important documents. Beyond that, you'll have to pay for the full version. This software managed to list down the files and folder in the TreeView, however for some reason, after leaving it to scan after a long while (few hours), the Tree View disappears and I'm just left with raw files without their names. I could not proceed with the recovery because I did not what these files are.

According to their website, they said you can recover up to 2GB for free. I installed it, and scanned it. It listed a few files. When I tried to recover it, it said I needed to purchase the full version. Obviously I did not proceed with the purchase as it had trouble scanning and listing the files as well for me.
3. MiniTool® Power Data Recovery V8
The free version allows you to recover up to 1GB. Again with all the other solutions, the software froze before the scanning could complete.
4. TestDisk
This requires the user to know how to use the command prompt as there isn't a GUI version. It seemed promising at first but after leaving it to scan for a few hours, I encountered an error and didn't bother to proceed. The good thing about this solution is that is freeware, although you can still donate if you find it useful.
At this juncture, I'm pretty much giving up on recovering my hard disk. This article serves more of a bookmark for me should I encounter another problem hard disk, and hopefully will have better luck with any of the solutions above.
Thursday, October 26, 2017
On a Mac OS and need writing to NTFS portable drives?

If you use a Mac OS, you should realize by now that while you can read from NTFS (Microsoft's Windows standards for file systems) hard drives, you are not able to write to it by default. To do so, you'll require third party tools to do it.
I came across this post comparing a few tools:
https://www.alexwhittemore.com/ntfs-on-macos-sierra-paragon-or-tuxera/
It compares Tuxera NTFS for Mac, Paragon NTFS for Mac 14, and NTFS-3G.
Long story short, if you happen to use Seagate portable drives, you can make use of the Paragon tool, which is free, but will only write to Seagate portable drives. I assume if you want to want to write non-Seagate NTFS drives, you'll have to pay for it. I personally use of Tuxera, and have been using their product for more than 7 years now without complaints. They have consistently updated their tool which each MacOS update (which happens quite frequently), and I haven't encountered any issue with it. Also, once you have purchased a license, you're entitled to upgrade for free. You can learn more about their products here: https://www.tuxera.com/products/tuxera-ntfs-for-mac/
Let me know what your thoughts if you're using it as well.
Outlook Mac 2016 (v16.7) High CPU Usage
Can't believe Outlook Mac kept giving me issues. This is the 2nd major one in a week.
Anyways, the issue was that after I did the previous fix (check out my previous post), Outlook was ok for a while. However, just after a couple of days using it, I noticed that it slowed down tremendously. Checking the Activity Monitor, it showed that Outlook was using up to 300% of the CPU resource. While I was still able to use it, it was terribly slow given that it was doing something heavy in the background.
Googling failed to come up with any solutions, apart from reinstalling everything. So I followed the instructions from this post:
https://community.spiceworks.com/topic/1607887-outlook-for-mac-v15-22-high-cpu-usage
Here's the excerpt:
Description of issue:
Hello all,
Yesterday I updated my Office applications for my MacBook Pro (running OS 10.10.5) to the version 15.22. Ever since then, my Outlook application has been using pretty much all of my CPU resources. It doesn't happen right away, normally takes an hour or so for it to start hogging them all, but once it happens Outlook becomes unusable and I have to Force Quit everything. In Activity Monitor it's showing CPU usage at somewhere like 780%, which is just absolutely bonkers.
Is anyone else running into this issue with the Office update? I haven't seen this happen with any other Office apps, but to be fair I hardly use anything but Outlook. Would really appreciate any advice or tips you could throw my way
Solution:
I did the above and reinstalled an older version (v15.39). That's fine by me cause at least it's usable again. Maybe it's time to turn off the Fast Insider updates.
Anyways, the issue was that after I did the previous fix (check out my previous post), Outlook was ok for a while. However, just after a couple of days using it, I noticed that it slowed down tremendously. Checking the Activity Monitor, it showed that Outlook was using up to 300% of the CPU resource. While I was still able to use it, it was terribly slow given that it was doing something heavy in the background.
Googling failed to come up with any solutions, apart from reinstalling everything. So I followed the instructions from this post:
https://community.spiceworks.com/topic/1607887-outlook-for-mac-v15-22-high-cpu-usage
Here's the excerpt:
Description of issue:
Hello all,
Yesterday I updated my Office applications for my MacBook Pro (running OS 10.10.5) to the version 15.22. Ever since then, my Outlook application has been using pretty much all of my CPU resources. It doesn't happen right away, normally takes an hour or so for it to start hogging them all, but once it happens Outlook becomes unusable and I have to Force Quit everything. In Activity Monitor it's showing CPU usage at somewhere like 780%, which is just absolutely bonkers.
Is anyone else running into this issue with the Office update? I haven't seen this happen with any other Office apps, but to be fair I hardly use anything but Outlook. Would really appreciate any advice or tips you could throw my way
Solution:
The Microsoft rep was not able to help me with this issue, but the
solution I found myself was just to uninstall and reinstall the Office
365 suite. To uninstall, I moved all Office programs to the Trash,
emptied it, then navigated to ~\Library\Containers and then deleted all
of the pertinent com.microsoft folders, as well as all Microsoft folders
located in ~\Library\Group Containers (UBF8T346... etc). Then I
reinstalled from my Office 365 login page, and have yet to reproduce the
issue.
Hope that helps.
Hope that helps.
I did the above and reinstalled an older version (v15.39). That's fine by me cause at least it's usable again. Maybe it's time to turn off the Fast Insider updates.
Tuesday, October 24, 2017
Outlook Mac 2016 not returning search results

My Outlook for Mac app recently got corrupted during an update. What happened was during the update, my Macbook froze and I had to restart. After the reboot, the Outlook app threw an error during opening. I had to delete it and reinstall again.
Outlook work after the reinstall, and I was glad I didn't have to setup the accounts again. Everything was as-is before the reinstall, except that the search was not returning all the results.
A couple of Google search and I came across this:
https://support.microsoft.com/en-sg/help/2741535/outlook-for-mac-search-returns-no-results--and-task-items-are-not-disp
Here are the contents of the above link:
Outlook for Mac search returns "No Results," and task items are not displayed
Symptoms
In
Microsoft Outlook 2016 for Mac or Office for Mac 2011, you receive a
"No Results" message when you try to search for an email message or
apply a filter to a folder, and task items are not displayed in the
Tasks folder. Additionally, when you search for mail items by using the
Mac OS native Spotlight Search, your search is unsuccessful.
Cause
This issue may occur for one of the following reasons:
Microsoft Outlook 2016 for Mac:
Microsoft Outlook for Mac 2011:
Microsoft Outlook 2016 for Mac:
- Spotlight Search indexing is incomplete.
- The Profile name contains special characters such as the slash mark (/).
- The Profile or one of its parent folders are added to the Privacy tab in Spotlight.
- The Outlook 15 Profiles folder is not located under ~/Library/Group Containers/UBF8T346G9.Office/Outlook.
- The Spotlight Search index is corrupted.
Microsoft Outlook for Mac 2011:
- Spotlight Search indexing is incomplete.
- The Identity name contains special characters such as the slash mark (/).
- The Identity or one of its parent folders are added to the Privacy tab in Spotlight.
- The Microsoft User Data folder is not located under the ~/Documents folder.
- The Spotlight Search index is corrupted.
Resolution
To resolve this issue, follow these steps:
- If you recently created a new Outlook Profile in Outlook 2016 for Mac, or a new Identity in Outlook for Mac 2011, added a new account, or if you recently imported new data from a source such as a PST or OLM file, Spotlight indexing may not be complete. In this case, Outlook for Mac displays a "No Results" message. To resolve this issue, wait for indexing to finish, and then search again.
- Make sure that your
Profile name in Outlook 2016 for Mac or your Identity name in Outlook
for Mac 2011 has no special characters, such as the slash mark (/).
To view your Profile or Identity name:Outlook 2016 for Mac:
1. Click Go, Applications.
2. Right-Click Microsoft Outlook, and select Show Package Contents.
3. Expand Contents, SharedSupport, and open Outlook Profile Manager.
Note You can create an alias for the Outlook Profile Manager, and move it to your desktop or another convenient location if you prefer.
Outlook for Mac 2011:
To view your Identity names in the Microsoft Database Utility, hold down the Option key, and then click the Outlook for Mac 2011 icon. - If the Profile or Identity name contains a special character, follow these steps to change the name:
- Open the Outlook 2016 for Mac Profile folder or Outlook for Mac 2011 Identity folder.In Outlook 2016 for Mac, the location is:
/Users/<Username>/Library/Group Containers/UBF8T346G9.Office/Outlook/Outlook 15 Profiles/
In Outlook for Mac 2011, the location is:
Users/<Username>/Documents/Microsoft user data/Office 2011 Identities/ - Rename the Outlook 2016 for Mac Profile folder name or the Outlook for Mac 2011 Identity folder name that contains special characters by removing the special characters.
- Confirm that the Profile or Identity
name was changed by viewing it in the following way depending on your
version of Outlook for Mac:
In Outlook 2016 for Mac:
1. Click Go, Applications.
2. Right-Click Microsoft Outlook, and select Show Package Contents.
3. Expand Contents, SharedSupport, and open Outlook Profile Manager.
NOTE You can create an alias for the Outlook Profile Manager, and move it to your desktop or another convenient location if you prefer.
In Outlook for Mac 2011:
Open the Microsoft Database Utility by holding down the Option key, and then clicking the Outlook for Mac 2011 icon. - If necessary, select the Profile or Identity whose name was changed, click the Gear icon, and then click Set as Default.
- Open the Outlook 2016 for Mac Profile folder or Outlook for Mac 2011 Identity folder.
- Verify in Mac OS that the Outlook Profile or Identity folder or one of its parent folders is not added to the Privacy tab in Spotlight. If your Outlook 2016 for Mac Profiles folder, or your Outlook for Mac 2011 Identity folder, or any of their parent folders are displayed in this tab, Spotlight does not index this folder location. Remove these locations from the Privacy tab in Spotlight, and allow for time for these locations to finish indexing.
- Make sure the Outlook 2016 for Mac Profile or Outlook for Mac 2011 Identity data is stored under the correct default location.
Outlook 2016 for Mac: Make sure that the Outlook 15 Profiles folder is stored under the ~/Library/Group Containers/UBF8T346G9.Office/Outlook folder.
Outlook for Mac 2011: Make sure that the Microsoft User Data folder is stored under the ~/Documents folder. - If the issue is still unresolved, the Spotlight index may be corrupted. To reindex the Spotlight index, follow these steps:
- Restart the Mac, so that it restarts the Spotlight services.
- Navigate to Finder > Applications > Utilities > Terminal.
- Type mdimport -L.
- Important: If you see more than one instance of "Microsoft Outlook Spotlight Importer.mdimporter," delete the Outlook application that you are not using, empty it from the Trash, restart your Mac, and go back to step 1.
- In the Terminal, reindex your Outlook database by using the following command and substituting your own user name for the <user_name> placeholder:
mdimport -g "/Applications/Microsoft Outlook.app/Contents/Library/Spotlight/Microsoft Outlook Spotlight Importer.mdimporter" -d1 “/Users/<user_name>/Library/Group Containers/UBF8T346G9.Office/Outlook/Outlook 15 Profiles/<my_profile_name>”
Note In this command, the path after "-g" is the default path of the Outlook installation. The path after "-d1" is the default path of your profile, where <my_profile_name> is, by default “Main Profile." You'll have to substitute your actual paths if you have renamed your profile or installed Outlook in a different location. - Reindexing will take some time to complete. After the process is complete, exit and then restart Outlook.
2398768 How to completely remove Office for Mac 2011
Hope this is helpful for you as it was for me.
Monday, March 2, 2015
Using Arduino to open and close gate at home
I've had the annoying experience of rushing from home to work, and only to have the security guard in my housing area to call me and tell me that I've left my auto gate open. My suspicion is that while I have already pressed the button on my remote control to close the gate, the gate's wheel could have gotten stuck due to a pebble in the tracks which causes the closing to stop, and the gate re-opening again. Given that my office is at least 45km away from home, going back all the way to just close it is not an option for me. I normally just hope no one walks into my home and steal my shoes that I leave outside my porch.
I already have IP cameras installed at various locations in my home. One of them is pointed at the front gate, which allows me to see whether if the gate is open or close. This is useful for times when I'm driving halfway, and then having the thought of wondering whether I have closed the gate or not.
But seeing the gate open 40km away is no help as well. So I decided to blow off the dust from my knock-off Arduino Duemilanove and put it to some good use.
My gate is controlled via a 315MHz (I think) RF keychain remote control. I know there are options where I could just buy a multifunctional RF Transmitter, but I wanted to go on the cheap, and also, I needed to solve this problem fast. These remotes are relatively cheap, and I keep a spare just in case I lose the one I normally carry. You can get these remotes clone for about RM50 - RM100, depending on the style and quality of the remote.
My remote runs on 12v battery. Getting this to work with the Arduino (as I have learned painfully) requires the use of other components (as Arduino tends to run 5V). Also, the button on the remote as I've found out is a pull-up, meaning, the voltage across the button is constantly on 12V, and when you depress the button, it goes to 0V and that's when the RF signal is sent out. I've tried using the digitalWrite and analogWrite function to see if I can short the button via 2 pins on the Arduino, but to no avail.
Good thing I found couple of reference on the internet of people who were trying to do the same thing. I will put those links later when I find them again. The proper way to do this is to use an NPN transistor, in which case I used the 2N2222 923 for this. There are examples of people using a 12V relay, but given that the remote i'm using runs on a very low current, the relay is pretty much an overkill.
Before I move on, I must give the disclaimer that I have pretty much zero background in electronics. What I mean is that while I'm interested in electronics, my theory of how transistors works is pretty much useless.
Here's the remote (the case removed) sitting on an Arduino breadboard shield. This makes it easier to wire everything up.

OK, moving on. The 2N2222 923 has 3 legs. The middle one is known as the base, and that's the one you will want to connect to the arduino digital pin (i used pin 2 for this). The other 2 legs of the transistor is connected to 2 pins of the remote button. Polarity matters in this case. I can't tell for sure which goes to which, however, I noticed that if I have the polarity reversed, the pins will short and the my remote button (which has a led indicator) will light up. So all I need to do is reversed it. Then that leaves the ground cable which you will connect from the arduino ground pin (look for GND), and you need to connect that to pin 1 of the transistor (if the flat side of the transistor is facing you, then pin 1 is the one on the far left).

Here's the Arduino sketch which I use:
void setup()
{
digitalWrite(2, HIGH); // sets the LED on
delay(1000); // waits for a second
digitalWrite(2, LOW); // sets the LED off
delay(1000); // waits for a second
}
void loop()
{
}
I know this is extremely lazy, as I have to upload the sketch everytime I want to open or close the gate. But this is just a conceptual test. Eventually, I guess you could hook this up to a webservice and have the gate control via an Android or iOS app.
Lastly, if case you're wondering how I'm going to control this remotely, I have VNC installed on a desktop sitting in my home, and the Arduino, along with the hooked up remote control connected to it. All I need to do is just to remote home, and upload the sketch to open or close the gate.
Nifty eh? Given all this done in less than 2 hours.
I already have IP cameras installed at various locations in my home. One of them is pointed at the front gate, which allows me to see whether if the gate is open or close. This is useful for times when I'm driving halfway, and then having the thought of wondering whether I have closed the gate or not.
But seeing the gate open 40km away is no help as well. So I decided to blow off the dust from my knock-off Arduino Duemilanove and put it to some good use.
My gate is controlled via a 315MHz (I think) RF keychain remote control. I know there are options where I could just buy a multifunctional RF Transmitter, but I wanted to go on the cheap, and also, I needed to solve this problem fast. These remotes are relatively cheap, and I keep a spare just in case I lose the one I normally carry. You can get these remotes clone for about RM50 - RM100, depending on the style and quality of the remote.
My remote runs on 12v battery. Getting this to work with the Arduino (as I have learned painfully) requires the use of other components (as Arduino tends to run 5V). Also, the button on the remote as I've found out is a pull-up, meaning, the voltage across the button is constantly on 12V, and when you depress the button, it goes to 0V and that's when the RF signal is sent out. I've tried using the digitalWrite and analogWrite function to see if I can short the button via 2 pins on the Arduino, but to no avail.
 |
| After figuring which of the 4 pins of the button is required, I soldered the 2 wires from the 2 pins. In case you don't know, this is the bottom side of the remote. The button is on the other side. |
Before I move on, I must give the disclaimer that I have pretty much zero background in electronics. What I mean is that while I'm interested in electronics, my theory of how transistors works is pretty much useless.
Here's the remote (the case removed) sitting on an Arduino breadboard shield. This makes it easier to wire everything up.
OK, moving on. The 2N2222 923 has 3 legs. The middle one is known as the base, and that's the one you will want to connect to the arduino digital pin (i used pin 2 for this). The other 2 legs of the transistor is connected to 2 pins of the remote button. Polarity matters in this case. I can't tell for sure which goes to which, however, I noticed that if I have the polarity reversed, the pins will short and the my remote button (which has a led indicator) will light up. So all I need to do is reversed it. Then that leaves the ground cable which you will connect from the arduino ground pin (look for GND), and you need to connect that to pin 1 of the transistor (if the flat side of the transistor is facing you, then pin 1 is the one on the far left).
Here's the Arduino sketch which I use:
void setup()
{
digitalWrite(2, HIGH); // sets the LED on
delay(1000); // waits for a second
digitalWrite(2, LOW); // sets the LED off
delay(1000); // waits for a second
}
void loop()
{
}
I know this is extremely lazy, as I have to upload the sketch everytime I want to open or close the gate. But this is just a conceptual test. Eventually, I guess you could hook this up to a webservice and have the gate control via an Android or iOS app.
Lastly, if case you're wondering how I'm going to control this remotely, I have VNC installed on a desktop sitting in my home, and the Arduino, along with the hooked up remote control connected to it. All I need to do is just to remote home, and upload the sketch to open or close the gate.
Nifty eh? Given all this done in less than 2 hours.
Tuesday, May 14, 2013
Previewing Office attachments in Microsoft Outlook 2013
If you run into this issue when you're trying to preview Office files (xlsx, pptx, docx) in Outlook 2013, and see this message instead:

.. this could be due to a DCOM setting issue. To fix it, follow this steps:
Source: http://www.thewindowsclub.com/cannot-open-word-excel-powerpoint-files-or-email-attachments-in-office-2010

.. this could be due to a DCOM setting issue. To fix it, follow this steps:
- Open Control Panel
- Open Administrative Tools
- Open Component Services and expand the tree under Console Root to Computers > My Computer.
- Right-click on My Computer and select Properties.
- Select the Default Properties tab and set the following values:
- Default Authentication Level: Connect
- Default Impersonation Level: Identify.
Source: http://www.thewindowsclub.com/cannot-open-word-excel-powerpoint-files-or-email-attachments-in-office-2010
Wednesday, May 8, 2013
Fixing the PDF preview issue in Outlook
I was facing this problem where every time I tried previewing a PDF file in Outlook 2013, I get the message
"This file cannot be previewed because of an error with the following previewer:
PDF Preview Handler for Vista
To open this file in its own program, double-click it. "
I tried googling several sites and most of them said to try this fix: http://www.howtogeek.com/howto/7682/how-to-fix-pdf-previews-in-outlook-or-explorer-on-64-bit-windows/
I tried it (both the manual registry fix, and the exe file which did the registry fix) but unfortunately, it didn't solve the problem for me. Then I saw another site that said upgrading the Adobe Reader to the latest version would fix it. I was using Adobe Reader v10, and there was a version XI available. When I've done with upgrade, I then got this message in Outlook:
"This file cannot be previewed because there is no previewer installed for it."
I then tried checking the preview add-ins in Outlook via File>Options>Trust Center>Trust Center Settings >Attachment Handling>Attachment and Document Previewers and couldn't find any PDF Preview Handler value there.
Further searching on the web led me to the only working solution I can find so far: http://social.technet.microsoft.com/Forums/en-US/outlook/thread/203d7369-b11c-4b9c-a90c-729f1776bd65
The fix is simply to reset the preview option for Outlook via modifying the registry via regedit. All you need to do is change in the registry the key HKCU\Software\Microsoft\Office\Previewers\pdf\PONTState value's data to 0 to re-enable the "always warn before previewing" for pdf attachments.
I finally managed to preview PDF in Outlook. FYI, I'm using Windows 7 x64 with Office 2013.
"This file cannot be previewed because of an error with the following previewer:
PDF Preview Handler for Vista
To open this file in its own program, double-click it. "
I tried googling several sites and most of them said to try this fix: http://www.howtogeek.com/howto/7682/how-to-fix-pdf-previews-in-outlook-or-explorer-on-64-bit-windows/
I tried it (both the manual registry fix, and the exe file which did the registry fix) but unfortunately, it didn't solve the problem for me. Then I saw another site that said upgrading the Adobe Reader to the latest version would fix it. I was using Adobe Reader v10, and there was a version XI available. When I've done with upgrade, I then got this message in Outlook:
"This file cannot be previewed because there is no previewer installed for it."
I then tried checking the preview add-ins in Outlook via File>Options>Trust Center>Trust Center Settings >Attachment Handling>Attachment and Document Previewers and couldn't find any PDF Preview Handler value there.
Further searching on the web led me to the only working solution I can find so far: http://social.technet.microsoft.com/Forums/en-US/outlook/thread/203d7369-b11c-4b9c-a90c-729f1776bd65
The fix is simply to reset the preview option for Outlook via modifying the registry via regedit. All you need to do is change in the registry the key HKCU\Software\Microsoft\Office\Previewers\pdf\PONTState value's data to 0 to re-enable the "always warn before previewing" for pdf attachments.
I finally managed to preview PDF in Outlook. FYI, I'm using Windows 7 x64 with Office 2013.
Wednesday, April 24, 2013
"Failed To Create Profile" Error when setting up on Google Apps Sync for Microsoft Outlook
Should you encounter this issue, try this:
1. Go to control panel
2. Select Mail
3. Select "Show Profiles"
4. Should you see any existing google mail profiles, select it, and click "remove".
5. Hit OK.
Then try setting up on Google Apps Sync for Microsoft Outlook.
I've tried this on Microsoft Windows 7 - 64 bit, running Microsoft Outlook 2013 - 64 bit as well.
Good luck!
1. Go to control panel
2. Select Mail
3. Select "Show Profiles"
4. Should you see any existing google mail profiles, select it, and click "remove".
5. Hit OK.
Then try setting up on Google Apps Sync for Microsoft Outlook.
I've tried this on Microsoft Windows 7 - 64 bit, running Microsoft Outlook 2013 - 64 bit as well.
Good luck!
Wednesday, April 17, 2013
MakerBot: Replicator 2
While the price tag could still be out of reach for most of us, expect it to drop as the demand for these printers increase. Regardless, if you already plan to buy it, check out the following link for more info: http://store.makerbot.com/replicator2.html
Monday, April 1, 2013
Yahoo! Mail on Outlook 2013
Do you want to get Yahoo! Mail on Outlook for free? Try this!
Hopefully, the settings would work for you. Let me know how it goes in the comments!
- Launch your Outlook (I'm using 2013 for this example, but previous versions should work as well).
- Select the "FILE" tab on top left corner and select "Account and Social Network Settings" under Account Information.
- Click on Account Settings, and in the dropdown, select "Account Settings".
- In the dialog window, under the E-mail tab, select New.
- Under Choose Service, Select "Email Account". Then click Next.
- Select "POP or IMAP", and hit Next.
- Under the POP and IMAP Account Settings, fill in your name and email address.
- For Server Information, fill in the following:
- Account Type: IMAP
- Incoming mail server: imap-ssl.mail.yahoo.com
- Outgoing mail server (SMTP): smtp.mail.yahoo.com
- Logon Information:
- User name: <youryahoologin>@yahoo.com
- Password: your yahoo password
- Check Remember Password
- Leave "Require logon using Secure Password Authentication (SPA)" unchecked.
- Hit More Settings:
- Under the "Outgoing Server" tab:
- Check "My outgoing server (SMTP) requires authentication
- Select "Log on using"
- User Name: <youryahologin>@yahoo.com
- Password: your yahoo password
- Check Remember Password
- Under Advanced:
- Under Server Port Numbers:
- Incoming server (IMAP): 143
- Leave "Use the following type of encrypted connection:" as "None" (this can help to prevent certificate issues, which can be extremely annoying).
- Outgoing server (SMTP): 465
- Select "Use the following type of encrypted connect:" as "SSL".
- Leave the rest as is.
- Hit OK to close the dialog and return back to the settings windows.
- Hit Next and you should be done!
Hopefully, the settings would work for you. Let me know how it goes in the comments!
Wednesday, March 27, 2013
Getting GMail on Outlook 2013
Google Apps Sync for Outlook currently only supports up to Outlook 2010. If you're using Outlook 2013, then you're out of luck of getting your Gmail in with Outlook. However, the good news is that there's a workaround, and though it's bit tedious, the end result is worth it.
First off, if you're upgrading from Outlook 2010, and you already have your GMail setup in your Outlook 2010, then it's much simpler to pull this off. However, just take note that you need to have the right platform of the Google Apps Sync tool to work. If you're currently running Microsoft Office 32bit, that would also mean that the Google Apps Sync tool you have is also on 32 bit. Hence, when you upgrade to Office 2013, it would be best if you upgraded to a 32 bit version of the Office suite as well. The same would go if you're on 64 bit. Just upgrade to the same platform to avoid complications.
Once you're done with Office upgrade, you would notice that if you tried to launch your Outlook, you will get some error message and your email won't sync. Fret not, just try this trick:
Make sure your Outlook is closed. Then using Windows Explorer, head towards this directory:
C:\Program Files\Google\Google Apps Sync\ and locate these 2 files:
First off, if you're upgrading from Outlook 2010, and you already have your GMail setup in your Outlook 2010, then it's much simpler to pull this off. However, just take note that you need to have the right platform of the Google Apps Sync tool to work. If you're currently running Microsoft Office 32bit, that would also mean that the Google Apps Sync tool you have is also on 32 bit. Hence, when you upgrade to Office 2013, it would be best if you upgraded to a 32 bit version of the Office suite as well. The same would go if you're on 64 bit. Just upgrade to the same platform to avoid complications.
Once you're done with Office upgrade, you would notice that if you tried to launch your Outlook, you will get some error message and your email won't sync. Fret not, just try this trick:
Make sure your Outlook is closed. Then using Windows Explorer, head towards this directory:
C:\Program Files\Google\Google Apps Sync\ and locate these 2 files:
gsync32.dll
unifiedlogin.dll
Copy both these files and head over to C:\Program Files\Microsoft Office\Office15\ and paste them in.
Fire up your Outlook and it should work again.
Secondly, if you're on fresh PC with no Microsoft Office installed, you will need to find a copy of Microsoft Office 2010 and install with that first. (A trial version will work as well). Make sure you take note of the platform again (32 bit or 64 bit). If you're planning to use 64 bit version of the Office 2013, then make sure you install the 64 bit version of Office 2010. Once you're done, download the Google Apps Sync (again, align the platform version with the office version). Install it, and follow the instructions to setup your Google Account. Make sure your profile have been successfully created. After that, follow the instruction above to upgrade your Office to 2013 version.
If you already have Microsoft Office 2013 installed without the Google Apps Sync setup, best is that you uninstall the 2013 and install 2010 first, setup the Google Apps Sync, then upgrade. I've tried without much success to get the Google Apps Sync to work without doing the steps I did above, and would best save you much time of having to go thru the learnings that I went thru.
Just FYI, if you tried setting up Google Apps Sync on Outlook 2013, you may encounter some of these issues:
1. After downloading the Google Apps Sync tool, and installing it, you will get this error:Your Microsoft Outlook (r) installation requires a 64-bit version of
Google Apps Sync to work properly. Please download and install the
64-bit version of Google Apps Sync.
For some reason, when you're at https://tools.google.com/dlpage/gappssync, it will download the wrong version if you have Office 2013 installed. I then tried to get the installer package directly from the source here:
Download 32-bit enterprise_gsync.msi (Outlook 2003, 2007, 2010 32-bit edition)
Download 64-bit enterprise gsync.msi (Outlook 2010 64-bit edition)
Download 32-bit enterprise_gsync.msi (Outlook 2003, 2007, 2010 32-bit edition)
Download 64-bit enterprise gsync.msi (Outlook 2010 64-bit edition)
2. Installing the downloaded package is straight forward, however, when you try to set up your Google Account, you will encounter message : "Failed to create profile".
I've not found a way to get around this error, and again, the only remedy that I could find was to do the above.
Hopefully you will find this useful and helpful.
Monday, January 24, 2011
MintyBoost v3.0 Assembled with enclosure for sale

I have only
Tuesday, October 26, 2010
MintyBoost v3.0


If you own an iPhone, or any mobile phones that allows USB charging, MintyBoost maybe just the extra power pack you'll need if you are constantly on the go and your existing phone battery drains out before you can get to the electrical outlet.
I ordered this kit for USD19.90 from Adafruit Industries. It has everything except the batteries, container, which unfortunately, is hard to get at the moment because Wrigley's, the manufacturer of the Altoids gum has decided to discontinue this product. While the kit is designed to fit in nicely in the Altoids gum tin, it can still be installed in other containers. I got mine from a local Daiso store (Japanese variety store). It's slightly larger than the gum tin, but I think it'll be great as I can use the extra space to store a short cable.
To build the kit, you will need to have some basic electronic tools, and skills of course. The process of building the kit is layout in detailed here. You will not go wrong if you follow the instructions step by step.
The final product (with my version of tin anyways):
Note that my tin does not have the hinged lid. I wished it did though so I won't accidentally misplace the lid. Anyways, considering that this is the only container I could find, it will have to do. These Eneloop batteries gives roughly about 60% charge. That means that if my phone's battery level falls to about 40-50%, I can get it to 100% with a pair of these batteries. Different batteries will give different results, but the general rule is the higher the mAh, the higher the capacity it can charge.
 The opening for the port was done by drilling the tin first, and then using a small file, I filed the edges till I have the shape of the plug. I'm guessing if I had a dremel tool, the results would be better. What do you think?
 Here's how it looks like with the lid closed.
 Another view.
Wednesday, October 20, 2010
Barrel Drum BBQ Pit (Charcoal)
I decided to try this project after seeing so many other examples of it on the web. The thing about doing this here in Malaysia is that it can be quite costly as most of the parts are not locally produced. The most expensive part of the pit are the grill plates, which set me back about RM160 as they cost RM80 a piece.

The drum costs only RM40, but the scary part about this is that I don't know what was in it before. The drum supplier could not tell me either as they get their drums from all over. I bought it anyways after making sure it had no weird odors.
The hardest part of this project would be the cutting of the drum. Since I did not have an arc torch, I got it cut at a nearby workshop instead. All I did was draw the intended portion to be cut, and they did the rest.
Once that was done, I installed the L-braces for the grill plate to rest on, and added an additional metal bar in the middle for extra stability. I also added hinges to the plate to act as a lid to my pit. I had no welder with me, so all these were done using traditional nuts and bolts to secure.
The stand I used is a simple scissors type structure which was carried over from my previous bbq grill.

I also had the inside of the drum sprayed with a high-temperature paint to prevent corrosion. I got this paint at Ace Hardware.

Here is the final product:

Do you have your own version of a barrel drum bbq pit? Share it with me by posting the link on the comments. Thanks for viewing!

The drum costs only RM40, but the scary part about this is that I don't know what was in it before. The drum supplier could not tell me either as they get their drums from all over. I bought it anyways after making sure it had no weird odors.
The hardest part of this project would be the cutting of the drum. Since I did not have an arc torch, I got it cut at a nearby workshop instead. All I did was draw the intended portion to be cut, and they did the rest.
Once that was done, I installed the L-braces for the grill plate to rest on, and added an additional metal bar in the middle for extra stability. I also added hinges to the plate to act as a lid to my pit. I had no welder with me, so all these were done using traditional nuts and bolts to secure.
The stand I used is a simple scissors type structure which was carried over from my previous bbq grill.

I also had the inside of the drum sprayed with a high-temperature paint to prevent corrosion. I got this paint at Ace Hardware.

Here is the final product:

Do you have your own version of a barrel drum bbq pit? Share it with me by posting the link on the comments. Thanks for viewing!
Monday, October 18, 2010
Date and Time on Arduino LCD Shield
Here's a project you can try if you have an Arduino Duemilanove and a compatible LCD Shield. Both boards I'm using is an Arduino knock-off and they're from DFRobot, a Chinese retailer specializing in sale of electronic and robotic components. You can find more of their products here: http://www.dfrobot.com/. If you're in Malaysia, you can try out their distributor at http://myduino.com/. They carry most of DFRobot's inventory, and also some of the original Arduino boards.
For this hack, I used the following:
1. A DFRduino Duemilanove (Arduino Compatible) 328 board
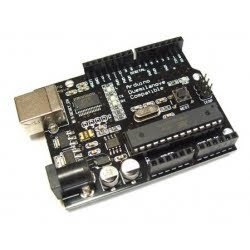
2. DFRobot LCD Shield for Aduino
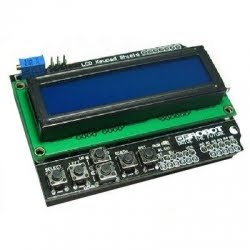
To program the codes, I use the latest Arduino Software, ver 0021, which you can download here: http://arduino.cc/en/Main/Software. This software allows you to write the script as well as compile the codes necessary for the Arduino to run.
Here are the codes I used:
#include <LiquidCrystal.h>
#include <DateTime.h>
#include <DateTimeStrings.h>
#define dt_SHORT_DAY_STRINGS
#define dt_SHORT_MONTH_STRINGS
// simple sketch to display a digital clock on an LCD
// see the LiquidCrystal documentation for more info on this
LiquidCrystal lcd(8, 9, 4, 5, 6, 7);
int backLight = 13; // pin 13 will control the backlight
void setup(){
pinMode(backLight, OUTPUT);
digitalWrite(backLight, HIGH); // turn backlight on. Replace 'HIGH' with 'LOW' to turn it off.
DateTime.sync(DateTime.makeTime(0, 44, 13, 16, 10, 2010)); // sec, min, hour, date, month, year // Replace this with the most current time
}
void loop(){
if(DateTime.available()) {
unsigned long prevtime = DateTime.now();
while( prevtime == DateTime.now() ) // wait for the second to rollover
;
DateTime.available(); //refresh the Date and time properties
digitalClockDisplay( ); // update digital clock
}
}
void printDigits(byte digits){
// utility function for digital clock display: prints preceding colon and leading 0
lcd.print(":");
if(digits < 10)
lcd.print('0');
lcd.print(digits,DEC);
}
void digitalClockDisplay(){
lcd.clear();
lcd.begin(16,2);
lcd.setCursor(3,0);
//lcd.print(DateTimeStrings.dayStr(DateTime.DayofWeek));
if(DateTime.Day <10)
lcd.print('0');
lcd.print(DateTime.Day,DEC);
lcd.print("/");
//lcd.print(DateTimeStrings.monthStr(DateTime.Month));
if(DateTime.Month <10)
lcd.print('0');
lcd.print(DateTime.Month,DEC);
lcd.print("/");
lcd.print((DateTime.Year,DEC)+2000);
//lcd.print(" ");
if(DateTime.Hour <10)
lcd.setCursor(5,1);
lcd.setCursor(4,1);
// digital clock display of current time
lcd.print(DateTime.Hour,DEC);
printDigits(DateTime.Minute);
printDigits(DateTime.Second);
}
Once you have all that done, stack the LCD shield on the Arduino board (make sure the pins line up), plug in the USB cables to the board as well as to your PC, and hit Compile on the Arduino software. The codes will be uploaded and you shall be able to see the result on your LCD screen!
If all goes well, you should be able to see the following:

Note that the keypad on the LCD shield is not functional as I did not include any codes for them to respond to. That itself may be the next hack for me to try!
Bugs/Problems/Feedback/Comments? List them down in the comments and I'll try my best to help you out!
For this hack, I used the following:
1. A DFRduino Duemilanove (Arduino Compatible) 328 board

2. DFRobot LCD Shield for Aduino

To program the codes, I use the latest Arduino Software, ver 0021, which you can download here: http://arduino.cc/en/Main/Software. This software allows you to write the script as well as compile the codes necessary for the Arduino to run.
Here are the codes I used:
#include <DateTime.h>
#include <DateTimeStrings.h>
#define dt_SHORT_DAY_STRINGS
#define dt_SHORT_MONTH_STRINGS
// simple sketch to display a digital clock on an LCD
// see the LiquidCrystal documentation for more info on this
LiquidCrystal lcd(8, 9, 4, 5, 6, 7);
int backLight = 13; // pin 13 will control the backlight
void setup(){
pinMode(backLight, OUTPUT);
digitalWrite(backLight, HIGH); // turn backlight on. Replace 'HIGH' with 'LOW' to turn it off.
DateTime.sync(DateTime.makeTime(0, 44, 13, 16, 10, 2010)); // sec, min, hour, date, month, year // Replace this with the most current time
}
void loop(){
if(DateTime.available()) {
unsigned long prevtime = DateTime.now();
while( prevtime == DateTime.now() ) // wait for the second to rollover
;
DateTime.available(); //refresh the Date and time properties
digitalClockDisplay( ); // update digital clock
}
}
void printDigits(byte digits){
// utility function for digital clock display: prints preceding colon and leading 0
lcd.print(":");
if(digits < 10)
lcd.print('0');
lcd.print(digits,DEC);
}
void digitalClockDisplay(){
lcd.clear();
lcd.begin(16,2);
lcd.setCursor(3,0);
//lcd.print(DateTimeStrings.dayStr(DateTime.DayofWeek));
if(DateTime.Day <10)
lcd.print('0');
lcd.print(DateTime.Day,DEC);
lcd.print("/");
//lcd.print(DateTimeStrings.monthStr(DateTime.Month));
if(DateTime.Month <10)
lcd.print('0');
lcd.print(DateTime.Month,DEC);
lcd.print("/");
lcd.print((DateTime.Year,DEC)+2000);
//lcd.print(" ");
if(DateTime.Hour <10)
lcd.setCursor(5,1);
lcd.setCursor(4,1);
// digital clock display of current time
lcd.print(DateTime.Hour,DEC);
printDigits(DateTime.Minute);
printDigits(DateTime.Second);
}
Once you have all that done, stack the LCD shield on the Arduino board (make sure the pins line up), plug in the USB cables to the board as well as to your PC, and hit Compile on the Arduino software. The codes will be uploaded and you shall be able to see the result on your LCD screen!
If all goes well, you should be able to see the following:

Note that the keypad on the LCD shield is not functional as I did not include any codes for them to respond to. That itself may be the next hack for me to try!
Bugs/Problems/Feedback/Comments? List them down in the comments and I'll try my best to help you out!
Subscribe to:
Posts (Atom)